MATCHING LENS BLUR ON DIFFERENT FORMAT SIZES
May 4, 2017
(click here to skip the intro and jump to the meat)
Hi, B----!
I just wanted to take some time to reply to this in detail because I think it's worth discussing. If the article you sent was worth a read, I hope this long email will be too.
I don't think anything in the article is wrong per se. But it is confusing enough to potentially mislead its audience into wrong conclusions.
I also find it silly that it proclaims “master trick” and even "magic" but then proceeds to circuitously and somewhat confusedly describe a few elementary concepts of photography or optics.
This is not an indictment of the techniques used in the movie that the article is talking about, but of the emphasis and wording of the piece.
In my opinion, the whole 2000-word article is not a description of some amazing new and magic “invention,” but just a somewhat confusing way to state three basic and unremarkable concepts of photography. The confusing but emotionally charged style of the piece may get more clicks than a clearer and more informative style would, but I don't think it's better for the reader's comprehension of the subject. So, here's how I would personally re-phrase the entire article in 3 bullet points that may not be as rousing but I think are clearer and more useful:
1. Barring manufacturing tolerances, if you have a lens with a given Angle Of View on one film-back size, if you find the focal length that yields the same Angle Of View for a different film-back size, then the two imaging systems will yield the same perspective* and frame-size. By “perspective” here, I mean a ray-traced projection of the 3D world onto a 2D plane, and by “film-back size,” I mean the size of the image area on the film or image-sensor. (The author of the article talks about finding this equivalence by "general agreement," but it can be computed simply and reliably without a quorum of opinion.)
2. Amount of blur changes with magnification and aperture size. So, if you’re trying to hold amount of blur constant, a change in f/stop can be offset precisely (or approximately if you don't like to do math) with a change in film-back size. (Below, I’ll explain the difference between Circles of Confusion, Blur Circles, and Depth of Field. The article concentrates on the last, which you’ll see is pointedly the wrong one to focus on. We all know perfectly well what the author means by the term ‘Depth Of Field', so fair enough if you want to call me pedantic for pointing this out. It’s just that if we want to come out of the article having a clearer not more confused conception of the subject matter, then we should clear up pre-existing hazy thinking rather than doubling down on it).
3. As a verbal shortcut, “film-back size” is often spoken of interchangeably with camera format like “16mm” or “Alexa” or "IMAX." But anyone who works in camera or VFX already knows (despite the article's assertion that it’s somehow a surprising, magical or novel idea) that film back size is limited to your framing area. So you can change your film-back size without going back to the rental house and exchanging your camera for a different model: just by changing your framing area within the entire expanse of the image-sensor or film-gate.
So, with these three concepts, we know that whether you use a different camera format or just crop your image area within the same format is immaterial. Either way: if you are satisfied that your specific version of a smaller film-back has enough resolution and low enough noise for your purposes, then you can use the smaller film-back rather than a tighter aperture to increase your depth of field (or a larger film-back to reduce it).
I personally don’t believe that looking at the number in front of the ‘K’ in the manufacturer’s advertising material is a good way to decide if cropping way in on a particular camera’s sensor is acceptable or not, as there are other factors that also affect a sensor’s suitability and shouldn’t be ignored; sometimes sensors with a smaller K-number actually have higher true resolving power and/or lower noise. So I think the article's emphasis on this being unique to the large K-number of one particular camera model is the most objectionably misleading thing in there. But counting megapixels versus true spatial fidelity is a different topic (which I’ve addressed elsewhere) so I’ll move on.
I think that within the scope of the 2000-word canvas, the article could have not only been clearer about these basic concepts (and not misrepresented them as master-level) but also gone slighlty further into some deeper underlying concepts.
Moreover it could have included some of the actual practical mathematical relationships. The article tries to impress us by sounding mathematical and mentioning some depth-of field numbers and focal length numbers, but it ends up using them only anecdotally and not even mentioning (let alone explaining) any coherent or usable mathematical relationship. If the author has to leave out math for fear of losing audience and ad revenue, that's fine, but in that case using pseudo-math to sound authoritative is misleading.
If we want to go further than the article did, we can’t elevate the reader’s understanding of this topic or find a numeric relationship while leaving out the key concepts (as the article has left out) of Angle Of View and Blur Circles. Meanwhile, the main concept that the article does hammer home, Depth Of Filed, is a bit of a red herring.
If we want to understand the topic better than we can from the article and, moreover, better than from the 3 bullet points above, let’s look at these concepts:
Angle Of View
Angle Of View is the attribute we’re trying to hold constant when we change film-back sizes but want “the same shot.” Just like when the article shows one image on a 100mm lens and then the exact same frame-size and perspective* achieved by cropping in on a 50mm.
In terms of perspective and framing only (not necessarily depth of field or resolution or grain/noise or optical aberation or anything else), any two images with the entrance pupil in the same position looking at the same scene will yield the same frame if they have the same Angle Of View, regardless of film-back size. This can be calculated simply and unambiguously:
a = 2 * arctan(.5 * F / f)
Where a is the Angle Of View, F is the film-back size and f is the focal length (with F and f in the same units).
So, (for example) an 18mm lens on a super-35mm-size film-back (which is 24.0mm across the gate) has an Angle Of View of 67.4º. To get that same 67.4º Angle Of View on an IMAX 15-perf 65mm camera (with a 69.6mm film-back), you’d need a 52.2mm lens.
They haven’t made a 52.2mm lens for IMAX, but luckily they have made a 50mm. And since we’re talking about re-drawing frame lines to change the film-back size, let’s just redraw the IMAX frame lines a little: from 69.6mm to 66.7mm, because we can do the same math the other way round and find that a 66.7mm film back is the size for which a 50mm lens yields our 67.4º Angle Of View.
Now I can demonstrate that this math (going both directions) works because this isn’t a hypothetical example: I’ve actually done it with real cameras and lenses.
Below is one image from an Alexa camera using an 18mm lens and another image from an IMAX camera with a 50mm lens. The same scene was photographed by each camera, and each camera had its entrance pupil in the same position. The results shown here are extracted from the frame areas mentioned above (24.0mm on the Alexa sensor and 66.7mm on the IMAX film plane) and the math works:
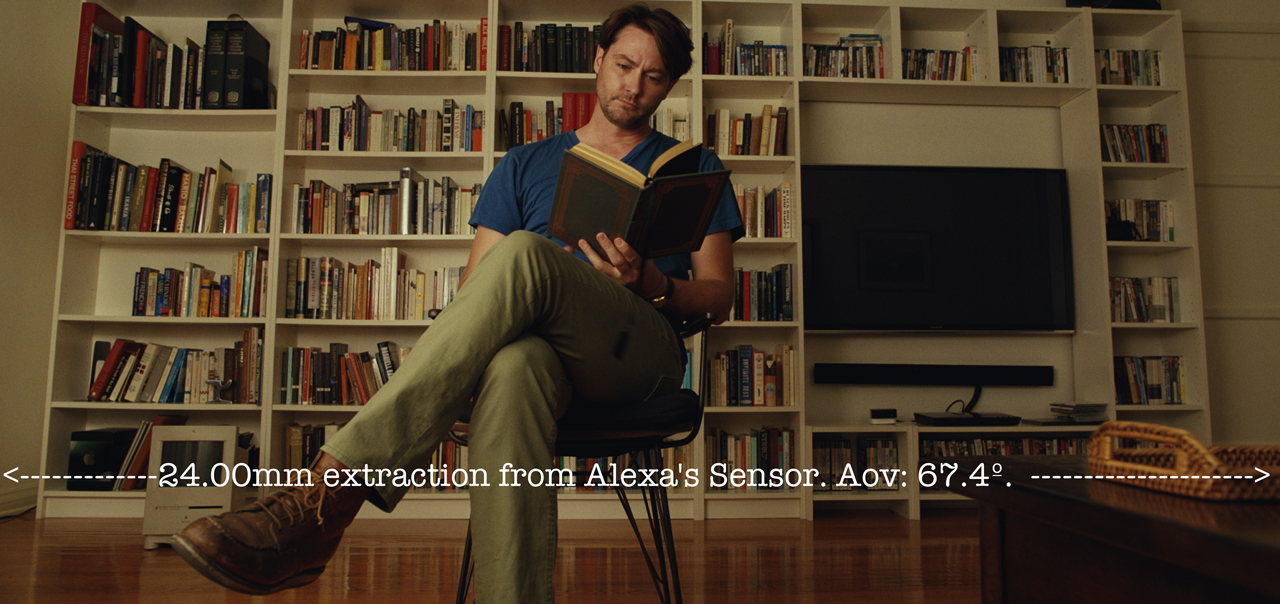
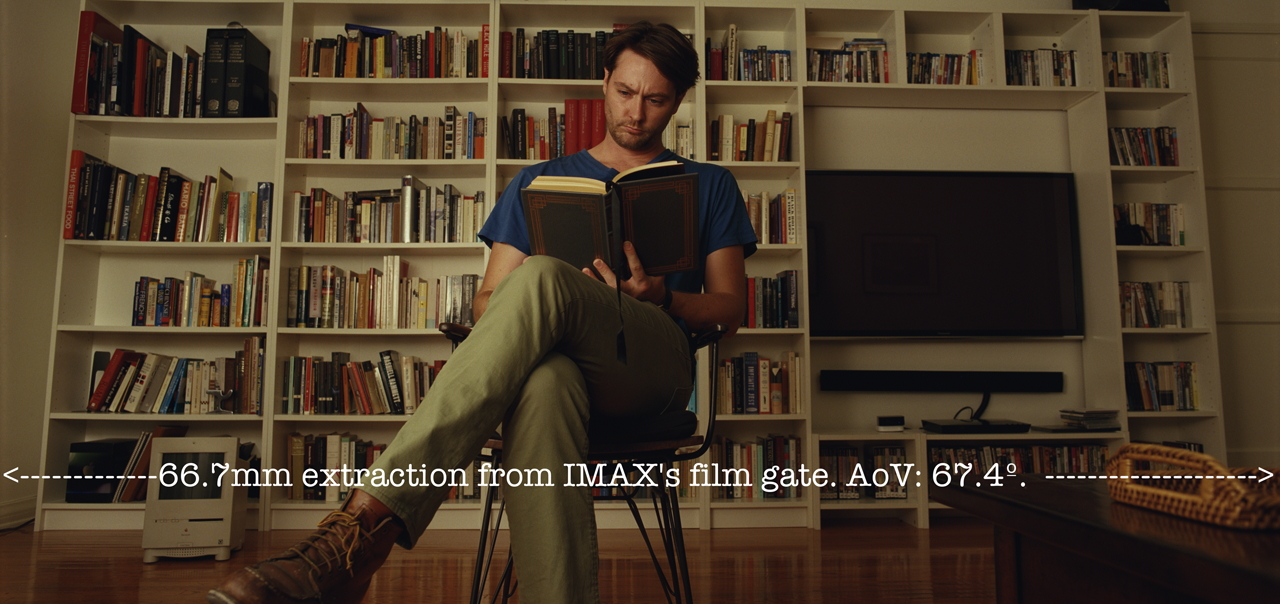
So, even though you sometimes hear people say things like “you get a different perspective when you shoot on different sized formats.” That’s not true unless you have some sort of compulsion that makes you set up a different shot when you use a different camera model. If you shoot from the same position with the same Angle Of View, you get the same perspective*, same frame size, same vanishing lines — regardless of film-back size.
I believe the author was actually trying to make this exact same point, but the message is so muddled in the article that I think most readers who don’t already understand it better than the author would either fail to understand that section at all or come away with a poorer comprehension of the subject than they started with. Moreover, we now see that this can be calculated precisely and reliably rather than estimated by surveying opinions.
Blur Circles (not Depth Of Field)
Depth Of Field is a red herring because it is an arbitrary motion picture standard. Whereas Blur Circles and Circles of Confusion are concepts from the hard science of optics: they’re asserted by the natural world and not by a standards committee or human perception.
Depth Of Field merely means “someone decided that it’s acceptably in focus.” There is only an infinitesimal plane that is truly mathematically in focus, but DoF says “this is the range in front and behind of that focus plane that has blur size that a standards committee decided can be lumped together because it all looks like it’s in focus.”
The real gold standard for VFX and the matching of the amount of blur as discussed in the article is not Depth of Field. It’s Blur Circles.
We hear more often about Circles Of Confusion than Blur Circles. The two are closely related but not quite the same, and Blur Circles are the concept that better fits what we’re after.
This is because “Circles of Confusion” refers to the absolute size (physical diameter) of the blur on the film plane (which is not what we’re trying to hold constant) whereas “Blur Circles” refers to the size of the blur relative to the image subject (not relative to the image area, but the image subject). In the example of the car in the article, we would want every bit of the car in the image (not just the part at the car at the focus plane) to have the same amount of blur (or lack thereof) with both film-back sizes.
Now that’s what we’re after! That’s what we’ve been trying to do the whole time but didn't quite have the words for: hold Blur Circles constant when we use the same Angle Of View on a different film-back size. That’s our goal; we can now state it unambiguously and succinctly!
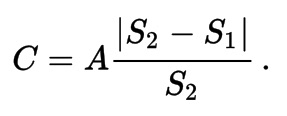
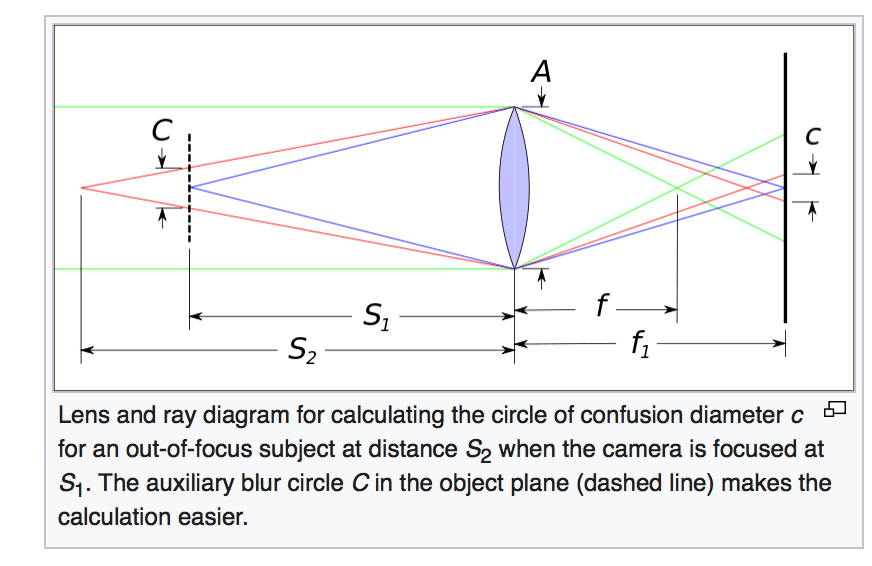
Blur Circles are not shifty or magical. They're very well defined. Here’s the formula and description from Wikipedia:
The Blur Circle, of diameter C, in the focused object plane at distance S1, is an unfocused virtual image of the object at distance S2 as shown in the diagram. It depends only on these distances and the aperture diameter A, via similar triangles, independent of the lens focal length:
But for our purposes, though, we don't need the formula from Wikipedia because we only need to know that our two images have the same size blur circles; we don't need to know what that size is. So, here's how we can figure that out easily:
Notice in the formula that the Blur Circle size is determined only by the subject distance, the focus distance, and the aperture. Not the focal-length or film-back size. That means that if we don’t change the scene being photographed (i.e. where the subject is or where the camera is or where the camera is focused), then we will always have the same Blur Circle sizes at a given aperture.
We’re almost there, but we’re missing something: from the previous paragraph you might think that you’d get the same Blur Circles at a given f/stop no matter the film-back size, which is obviously absurd. But the problem with that logic is that aperture and f/stop are not the same thing in this case. Aperture in the formula refers to absolute aperture but f/stop is relative aperture. F/stop differs from absolute aperture by a factor of the magnification, which is proportional to focal length. (https://en.wikipedia.org/wiki/F-number)
When we reduce the film-back size, we also reduce the magnification because our whole project here demands that we hold the Angle Of View constant when we change film-back size — and a smaller film back size needs less magnification for the same Angle Of View (that’s why we use an equivalent focal length rather than the same focal length).
Look at how convenient this all is though: we’re scaling the magnification proportionally with the film-back; and the Blur Circles are proportional to magnification. That means that the change in Blur Circle diameter is simply proportional to the change in film-back size (provided we use a lens with the same Angle Of View for that film-back, which is our whole intent here anyway).
Now we have it! In order to match Blur Circles, we need to change the diameter of the aperture proportionally with the change in magnification. We almost could have guessed it right off without all this rigmarole: it makes total sense that, since the iris diameter is what makes the blur, all we need to do is scale our iris diameter proportionally as we scale the image magnification (it's actually inverse proportion -- to counteract the effect instead of compounding it).
Here's how we actually do it: The f/stop numbers are already proportional to the aperture diameter by their very definition, so all we have to do is multiply the f/number by the ratio of film-back sizes.
In the example above, the 66.7mm film-back was shot at f/11. So, to match it on the 24.0mm film-back, then we have:
11 * 24 / 66.7 = 3.96
This isn’t hypothetical, I’ve actually done this! However, in reality I didn’t shoot at an f/3.96 (that’s a weird f/stop!), instead I shot at an f/4.0, which is a number that’s actually marked on the lens barrel. You've already seen that this works because I did it in the comparison above, but here's the same thing yet again on a different shot that has objects at more varying depths, so you can better see amount of blur at various distances:

The two images have Blur Circles whose sizes at all distances from the focus plane match exactly as well as we'd predict! I say it this way because they match incredibly well but not quite perfectly. But even the fact that the match isn't perfect is correct and predicted by the concepts. Here are two reasons why the Blur Circle matches should be ever so slightly off from perfect:
1. Blur Circles are calculated with f/stop numbers but the lenses are marked in t/stops. The difference between t/stop and f/stop is not the same for different lens models, and the two cameras used different lens models.
2. I rounded the f-number and shot at f/4.0 instead of f/3.96.
So the images show that this math all works. So this is all meaningful for both conceptual understanding and practical application! Though I admit this has been longer than the 2000-word length of the article, we’ve pretty clearly tackled the broad concepts, got some underlying concepts, and also given some useful formulas for matching Angle Of View and Blur Circles.
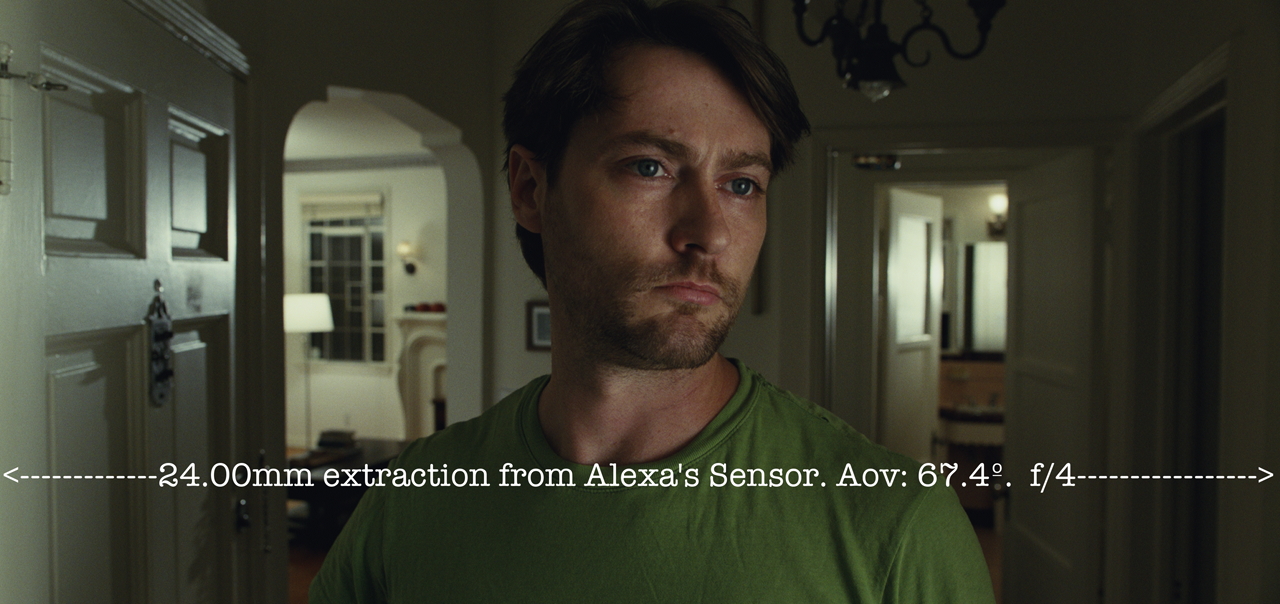
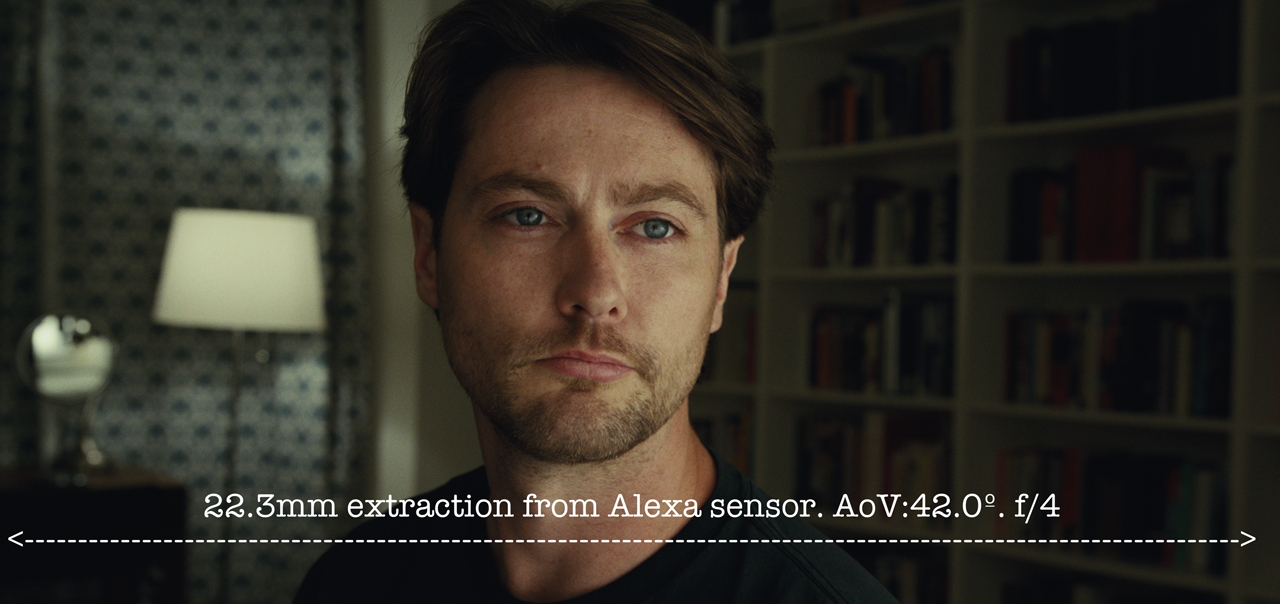
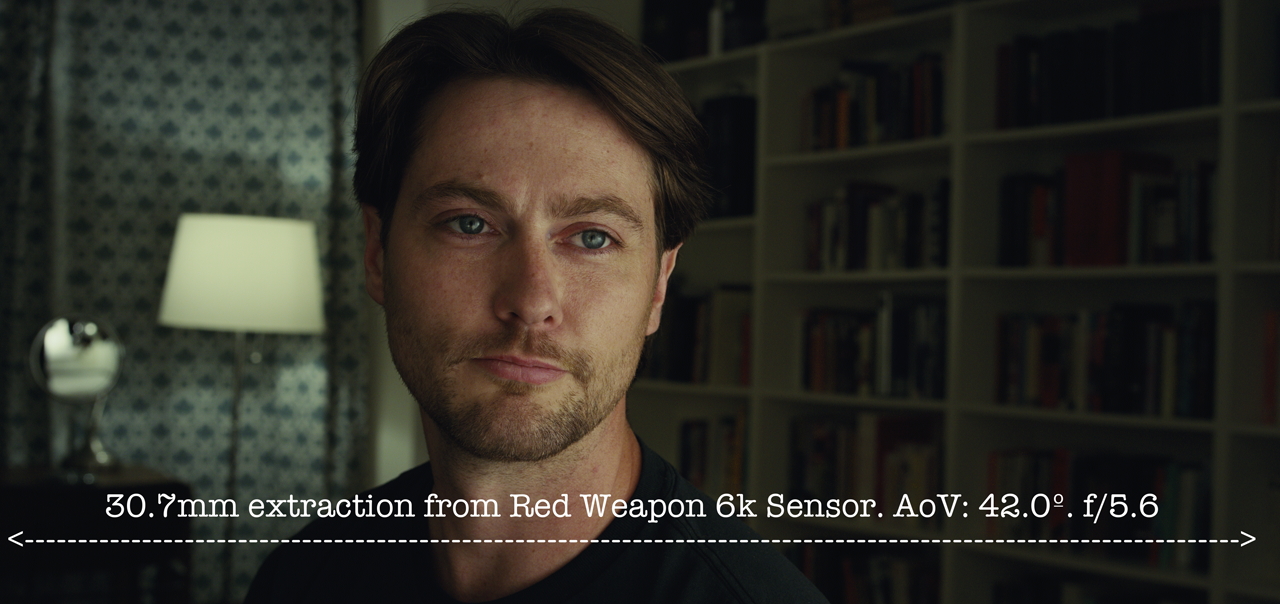
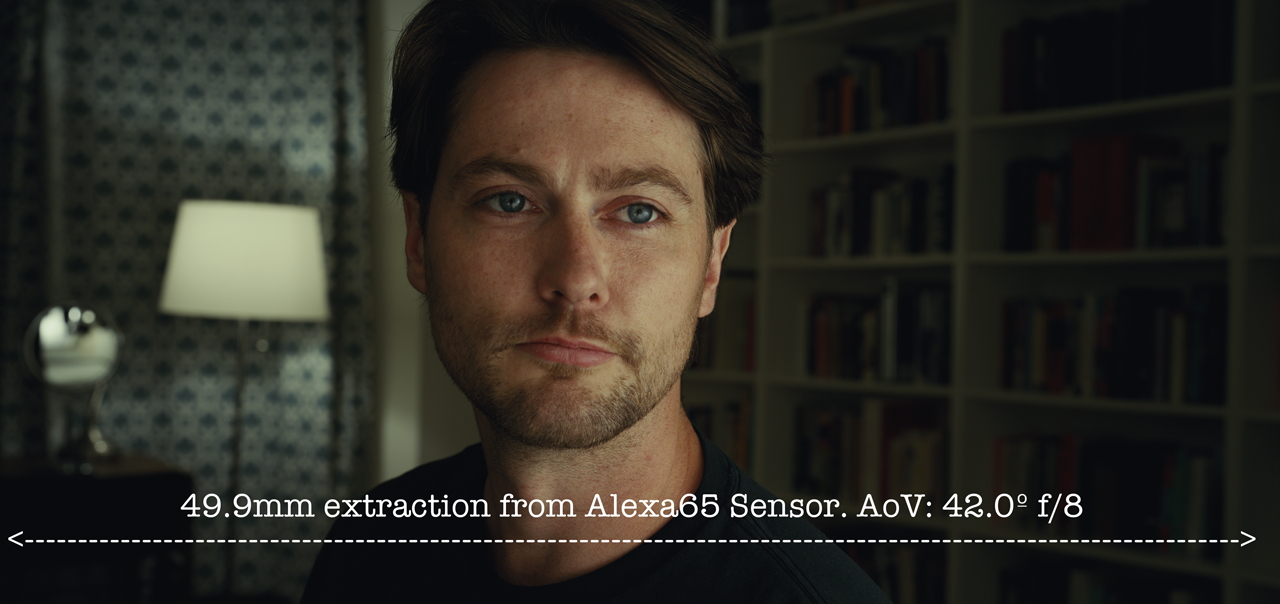
Before I sign off, here’s another shot with a different Angle Of View (42.0º instead of 67.3º) and with 4 different film-back sizes (instead of 2). The Angle Of View and Blur Circles have again been matched with the same math... to show it works in various circumstances and wasn’t a coincidence (again, the f/stops are rounded, so it's correct and expected that the match is almost but not quite perfect):
Cheers!
-Steve
*PERSPECTIVE
I've put an asterisk next to the word "perspective" on this page, because this is a potentially important footnote.
As stated above, "perspective" properly means "a ray-traced projection of the 3D world onto a 2D plane." And, as such, perspective is determined only by the positon of the entrance pupil in space.
However, there are other attributes that could falsely appear to alter the perspective. These occur when the already-2D image is warped or distorted. In other words: when the 3D projection onto a 2D plane remains unchanged but the 2D image is warped. This could give the false sense of a different perspective.
There are many subtle examples of this, but an exaggerated example is when photographers use a view camera or swing/shift lenses to distort vanishing lines. If I take a photo of a tall building with the camera pointed up from the ground, I could use the view camera's lens to warp the image so that the vanishing lines of the building are wider at the top and narrower at the bottom. Although this might give the false impression that the camera was above building, the photo will still show the undersides of the building's balconies and not the top surface of the roof of the building. The warped image has the same perspective of the real 3D world as non-warped image, despite the fact that the warping may subjectively invoke an imagination of a different perspective.
This distinction is important to understand when we are flooded with deceptive rhetoric about different formats having different "perspective," because, for example, many anamorphic lenses project the 3D world onto a 2D plane with a geometry that is approximately equisolid whereas many spherical lenses project the 3D world onto a 2D plane with a geometry that is approximately rectilinear. This does not change the image's perspectival information about the real 3D world. It's merely a 2D warping of the image. Such a 2D warping done with camera optics is literally (not just approximately) the same as doing the same warping in post, using image processing.
This example of the view camera is exaggerated and does not apply to most practical circumstances, but the distinction it exemplifies is a very practical one, because real 3D perspective cannot be changed in image processing (not easily, anyway; it can be changed as a time-consuming and complex visual effect by a talented artist), whereas it is trivially simple in post to distort or un-distort the type of 2D image-warping that differentiates various lens models.
So, real 3D perspective is determined only by camera placement and is fundamental to any given image, whereas optical warping by a given lens model is not the same thing and is comparatively trivial.
Note that in the image examples on this page, I have not done any processing of the images to equalize the not-identical 2D warping of the various lens models used. This is significant because: look at how similar they already are without any such processing, and yet even the remaining minor variances could be equalized easily with a simple image processing step.
I bring up this footnote not because it's anything like the main point in this piece, but merely to debunk objections to it which fail to recognize the important distinction between actual perspective on the real 3D world and simple warping of a 2D image.